Error 36 means that the sensors on your robot were not cleared when the robot evacuated debris into the dock. You may also see a red light ring sweeping towards the rear of the robot.
To help resolve this, please follow these steps:
If the robot doesn't evacuate debris, this could also lead to an Error 36. Please make sure there is no clog in the dock itself. If the robot can't properly evacuate, the bin will remain full and trigger error 36.
- Press the bin release button on the back of the robot to remove the bin. The bin release tab has a
 bin icon on it.

- Open the bin door to empty the bin. The bin door release button has a bin icon.
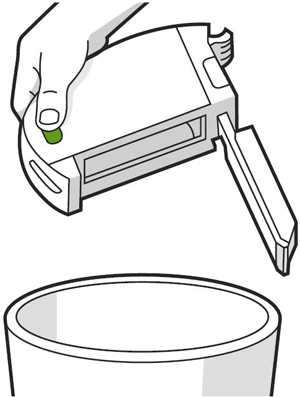
- Grasp the side of the filter to remove the filter from the left side of the bin.

- Rinse the bin and bin door with water, and let them air dry.
- Wipe the Bin Full sensors on the robot with a clean, dry microfiber or soft cotton cloth.
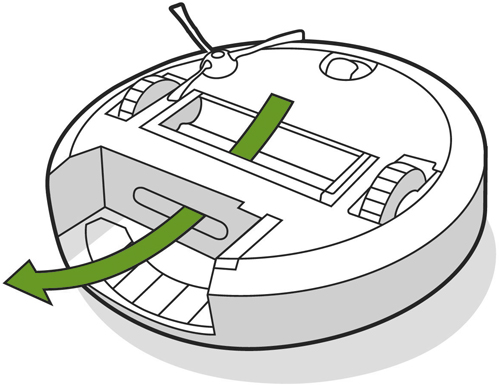
- Remove the brushes and ensure the vacuum path is clear of debris.
 |  |
| Outer Sensors | Inner Sensors |
Full bin sensors:
Left sensors
 |  |
| Dirty Sensor | Clean Sensor |
Right sensors
 |  |
| Dirty Sensor | Clean Sensor |
Inner sensors:
Left port sensors
 |  |
| Dirty Sensor | Clean Sensor |
Right port sensors
 |  |
| Dirty Sensor | Clean Sensor |
Outer sensors:
Left port sensors
 |  |
| Dirty Sensor | Clean Sensor |
Right port sensors
 |  |
| Dirty Sensor | Clean Sensor |
After cleaning the sensors, please try the robot again. These steps should clear the error. If the issue persists, please continue with the dock maintenance steps.
Dock maintenance:
The Roomba® i, j series, and Combo 10 Max communicate with the dock via the charging contacts. It's possible there could be enough contact to charge, but not enough to fully communicate with the base. Please clean the Charging Contacts to try to clear the error.
How to Clean the Contacts:
- Unplug the Dock and wait 60 seconds.
- Remove the robot from the charging station and place the robot upside down on a flat surface.
- Grab a lightly dampened melamine foam, such as a Magic Eraser, or a lightly dampened cloth.
- Clean the charging contacts on your robot. They should have a visible shine.
 |  |  |
| Robot Charging contacts | Home Base charging contacts | Dock charging contacts |
 |  | |
| Clean Base Auto-Fill Dock™ | Auto-Wash™ Dock | |
Note: Use a lightly dampened melamine foam, such as a Magic Eraser, or a lightly dampened cloth to clean the contacts. These are the only two acceptable materials that should be used to clear the contacts. Do not use any abrasive material to clean the contacts.
Finally, perform a Robot Reboot by pressing and holding the button for about 20 seconds. Then try running the robot once more.
After performing dock maintenance, please try the robot again. This should be able to clear the error. If the issue persists, there may be dust behind your bumper preventing communication with the Clean Base.
Please follow these steps
Follow the steps below to remove the bumper and clear the debris preventing communication.
- Flip the robot over
- Remove the side brush
- Remove the bottom cover
- Remove the 12 screws holding the bottom part of the bumper
- Remove the bottom part of the bumper
- Using a cotton swab, clear any dust build-up on the IR sensors (see the image below)
- Move the bumper back into position
- When putting the bottom part of the bumper on, ensure the clips are aligned
- The bumper should be even on both sides
- Reinstall the 12 screws securing the bottom part of the bumper
- Flip the robot over and make sure the bumper moves freely
- Flip the robot back over
- Reinstall the bottom cover
- Reinstall the side brush

Non-modular robots:
Newer i1, i3, and i5 robots will be non-modular, meaning the bottom cover cannot be removed.
There are two easy ways to confirm if you can remove the bottom cover. Pick the easiest one.
- Check the serial number. If the eighth digit is the letter N or Z, the robot is not modular.
Example: i557020NYYMMDDN4##### or i557020ZYYMMDDN4#####. If it's any other letter, the CHM can be replaced.
- Flip the robot over and look for a battery door. If your robot has a battery door, then the bottom cover does not come off, and the CHM cannot be replaced.
 |  |
| Original Bottom Cover | New Bottom Cover with Battery Door. (No modules) |
If the issue persists, you can try performing a factory reset on the robot. This should clear the error.
NOTE: A factory reset will revert the robot to factory settings. This will delete any saved data, and you will need to set up the robot again. This troubleshooting step is the final step for clearing the error. If the error continues, please contact iRobot Customer Care.
For expedited service, please have the following ready: